Mettre à jour mes paramètres de messagerie vers Exchange dans Outlook sur Mac
Si vous avez migré un compte de messagerie POP ou IMAP vers Microsoft 365, exportez vos données précédemment enregistrées localement et configurez votre nouveau compte avec les paramètres Exchange. L'utilisation d'Exchange garantit que vos données - y compris votre messagerie, vos contacts et vos calendriers - restent connectées à votre messagerie et peuvent être récupérées à partir du serveur chaque fois que nécessaire.
Lors de l'activation, vous pouvez ajouter des plans de messagerie supplémentaires, tels que Email Essentials, Email Plus ou Online Business Essentials.
Étape 1: Exportez vos données
Suivez les instructions d'Outlook sur Mac pour exporter les données de votre compte POP ou IMAP . Vous allez télécharger une sauvegarde de votre messagerie, de vos contacts et de votre calendrier. Si quelque chose manque après la création de votre nouveau compte Exchange, nous importerons la sauvegarde.
Étape 2: Ajoutez votre compte comme Exchange
Créez un nouveau compte avec les paramètres Exchange.
- Ouvrez Outlook.
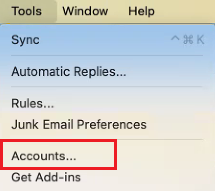
- Dans la barre de menus, sélectionnez Outils , puis Comptes .

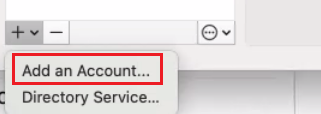
- Sélectionnez + (plus) , puis Ajouter un compte .

- Entrez votre adresse email, puis sélectionnez Continuer . Pour continuer, vous devrez peut-être choisir le type de votre compte Professionnel ou scolaire , et non Personnel .
- Entrez votre mot de passe de messagerie, puis sélectionnez Se connecter .
- Si votre administrateur a activé l'authentification multifactorielle (MFA), vérifiez votre compte ou configurez l'application Authenticator .
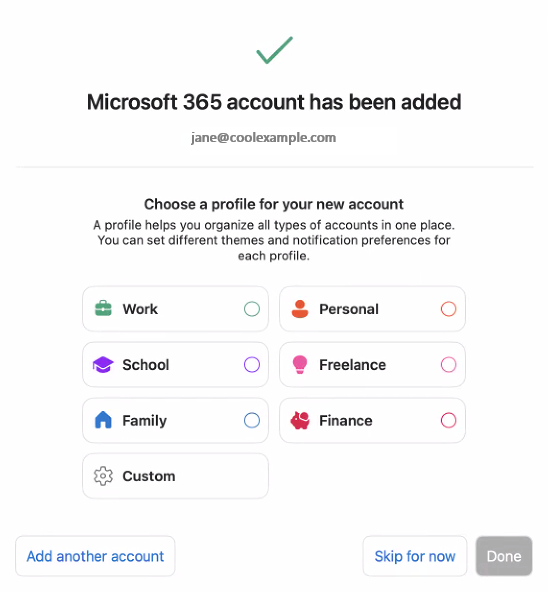
- Choisissez un type de profil, puis sélectionnez Terminé . Sinon, sélectionnez Ignorer pour le moment .

Étape 3: Importez vos données
Si l'une de vos données est manquante dans votre nouveau compte Exchange, suivez les instructions d'Outlook sur Mac pour importer les données depuis votre compte POP ou IMAP.
Étape 4: Supprimez votre compte POP ou IMAP
Une fois que votre compte a été ajouté en tant qu'Exchange et qu'aucune donnée ne manque, supprimez votre compte POP ou IMAP.
- Dans la barre de menus, sélectionnez Outils , puis Comptes .

- Sélectionnez votre compte POP ou IMAP, puis – (moins) .

- Sélectionnez Se déconnecter . Lorsque vous fermez la fenêtre du compte, vous ne voyez que votre compte Exchange répertorié dans Outlook.
Félicitations! Votre compte a été mis à jour pour utiliser les paramètres Exchange dans Outlook.
En savoir plus
- Vous n’avez pas encore l’application de bureau Outlook? Téléchargez-le .
- Configurez Exchange sur vos autres clients de messagerie.