Installer en ældre version af WordPress
Følg disse trin, hvis du vil installere en tidligere version af WordPress. Du skal muligvis have en ældre version af WordPress for at opretholde kompatibilitet med tema/plugin eller af andre årsager. For at følge trinnene nedenfor kan du bruge en hvilken som helst FTP -app, du kan lide, men her beskriver vi installation af WordPress med FileZilla .
Bemærk: Fordi ældre versioner af WordPress måske er mindre sikre, anbefaler vi kun disse trin, hvis der ikke er nogen anden måde at bevare dit tema/plugin -kompatibilitet på.
- Download .zip fra WordPress -udgivelsesarkivet.
- Opret forbindelse til din hosting med FTP .
- Naviger til den mappe, hvor du vil installere WordPress. Denne mappe kaldes WordPress rodmappe.
- Upload .zip -filen.
- Udpak filen. ( cPanel / Plesk )
Bemærk: Hvis du ikke har mulighed for at pakke filen ud på din hostingkonto, skal du pakke den ud på din lokale computer og derefter uploade den udpakkede wordpress -mappe.
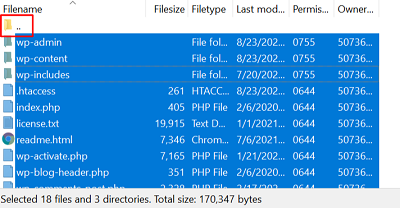
- I FileZilla skal du åbne wordpress -mappen og vælge alle filer og mapper ved at trykke på Ctrl + A for Windows eller command + A for Mac.
- Træk og slip det valgte indhold til WordPress -rodmappen (det røde felt vist på dette skærmbillede).

- Opret en MySQL -database og -bruger. ( cPanel / Plesk ) Du skal bruge databaseoplysningerne, når du installerer WordPress manuelt.
- Fra din browser skal du navigere til dit domæne.
- Vælg dit foretrukne sprog, og vælg Fortsæt .
- Lav et notat af de nødvendige databaseoplysninger, og vælg derefter Lad os gå . Databasepræfikset er som standard indstillet til wp_.
Bemærk: Du kan finde dit databaseværtsnavn, hvis du ikke kender det.
- Indtast oplysningerne for den MySQL -database, du oprettede tidligere, og vælg Indsend .
- Vælg Kør installationen .
- Udfyld formularen ved at indtaste følgende oplysninger:
- Sitetitel er dit WordPress -sitets titel.
- Brugernavn bruges til at få adgang til WordPress Dashboard.
- Adgangskode bruges til at få adgang til WordPress -dashboardet sammen med brugernavnet.
- Din e -mailadresse er det sted, hvor du modtager meddelelser, som du konfigurerer til dit website.
- Vælg Installer WordPress . Du skulle se Succes! bekræftelsesmeddelelse med dit brugernavn.
- Vælg Log ind . Du kan nu logge på din hjemmeside med legitimationsoplysninger, der blev konfigureret i trin 13.
Flere oplysninger
- Vend tilbage til Installer WordPress .